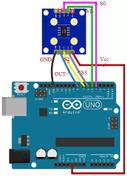
GSR Sensor Interfacing with Arduino: Code and Schematic
Advertisement
This page explains how to interface a GSR sensor with Arduino, including the necessary code and a block circuit schematic.
Introduction
EDA (Electro Dermal Activity) refers to the electric characteristics of human skin. According to EDA principles, skin resistance changes based on the activity of sweat glands within the skin. Our nervous system controls sweating, and skin conductance serves as an indicator of physiological arousal.
What is a GSR Sensor?
GSR stands for Galvanic Skin Response. A GSR sensor measures the electrical conductance of the skin. It typically consists of two electrodes placed on two fingers of one hand.
GSR sensors are used to monitor sleep quality and measure emotional arousal. Essentially, a GSR sensor functions as a kind of ohmmeter, measuring the electric conductance between two points.
Sweat glands in our bodies are controlled by the nervous system. Due to varying emotional states, such as stress or relaxation, the amount of sweat produced by these glands changes. Skin conductivity changes with sweat secretion. These conductivity changes can be measured by monitoring voltage variations.

When skin resistance is high, conductive voltage is low, and vice versa. For optimal results, electrodes are often placed on the index and middle fingers due to thinner skin and less hair in those areas. GSR sensors from Seeed Technology Co., Ltd., include Grove GSR v1.0 and Grove GSR v1.2. The part number SKU: 078-101020052 represents a GSR sensor from Seeed Studio. In India, these sensors are distributed by Evelta Electronics, Mumbai.
GSR Sensor Interfacing with Arduino Block Circuit Schematic
The GSR sensor needs 5V for operation. Data acquisition occurs within a range of 1 to 10 Hz. The GSR signal is based on conductance, which is the inverse of skin resistance.
Refer to the working operation of GSR sensor for more details.

The following table outlines the connections between the GSR sensor and an Arduino board.
| GSR sensor | Arduino Uno Board |
|---|---|
| VCC | 5V |
| GND | GND |
| SIG | A0 |
GSR Sensor Interfacing with Arduino Code
The following Arduino code demonstrates how to interface a GSR sensor with an Arduino UNO or Arduino Mega board. After compiling and running this code, it reads the sensor value from the GSR sensor connected to analog pin A0 of the Arduino board.
The code reads analog data (in the range of 0 to 1023) and converts it into an analog voltage within the range of 0 to 5V. The converted voltage is then displayed on the serial monitor. The initial serial communication speed is set to 9600 bps.
const int LED = 13;
const int GSR = A0;
int sensorValue;

void setup() {
  Serial.begin(9600);
  pinMode(LED, OUTPUT);
  digitalWrite(LED, LOW);
  delay(1000);
}

void loop() {
  int temp;
  float conductivevoltage;
  sensorValue = analogRead(GSR);
  conductivevoltage = sensorValue * (5.0 / 1023.0);
  Serial.print("sensorValue=");
  Serial.println(sensorValue);
  delay(100);
}
Advertisement
 RF
RF


