 RF
RFInterfacing Blood Pressure Sensor with Arduino: Code and Schematic
Advertisement
This document explains how to interface a blood pressure sensor with an Arduino, including the necessary code and a block circuit schematic.
Introduction
Measuring blood pressure is crucial for detecting potential health issues such as heart attacks, strokes, and kidney diseases. High blood pressure often presents no noticeable symptoms, making regular monitoring essential.
What is a Blood Pressure Sensor?
A blood pressure sensor, also known as a Sphygmomanometer, is a device used to measure blood pressure. The measurements typically include systolic pressure, diastolic pressure, and pulse rate.
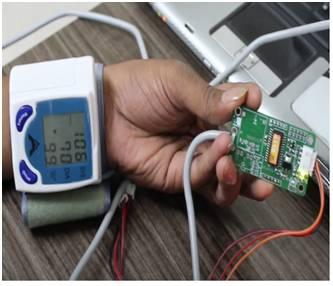
Image: Blood Pressure Sensor
The blood pressure sensor manufactured by Sunrom has following features:
- Automatic compression/decompression
- Easy to operate using a button
- Memory to save measurements
- Automated power saving
- Large LCD screen
- Requires +5V for operation
- Serial output in ASCII format at 9600 baud
Blood Pressure Sensor Interfacing with Arduino: Block Circuit Schematic
Interfacing a blood pressure sensor with an Arduino or any microcontroller equipped with UART (Universal Asynchronous Receiver/Transmitter) is straightforward. The Arduino or microcontroller needs to be configured to communicate at 9600 baud. The schematic below illustrates how to connect the sensor with the Arduino.
Important: Disconnect the Rx pin of the Arduino from the Tx pin of the sensor module while uploading the code. Reconnect these pins after the code is successfully uploaded.

Image: Blood Pressure sensor interfacing with arduino
The following table outlines the connections between the Blood Pressure sensor and the Arduino Uno board:
| Blood pressure sensor | Arduino Uno Board |
|---|---|
| VCC | 5V |
| GND | GND |
| Tx-OUT | RxD pin |
Blood Pressure Sensor Interfacing with Arduino Code
The following Arduino code facilitates interfacing the blood pressure sensor with the Arduino board. The blood pressure sensor outputs data in 8-bit ASCII format, ranging from 000 to 255. Systolic pressure, diastolic pressure, and pulse rate are separated by commas and spaces. The last byte of the data packet is always 0x0A (hexadecimal) or 10 (decimal), which allows each reading from the sensor to be displayed on a new line. The serial communication speed is initially set to 9600 bps.
#include <SoftwareSerial.h>

int sensorValue; // variable to store the output from the sensor
SoftwareSerial serial(9,10);
char sbuffer[14], ch;
unsigned char pos;
unsigned char read1, read2, read3;
boolean newData=false;

void setup() {
  Serial.begin(9600);
  Serial.begin(9600);
  Serial.println("<Arduino is ready>");
}

void loop() {
  recvChar();
  showNewData();
}

void recvChar() {
  if (Serial.available() > 0) {
    while(Serial.available()>0) {
      ch = Serial.read();  //loop till character received
      if(ch==0x0A)    // if received character is <LF>, 0x0A, 10 then process buffer
      {
        pos = 0;        // buffer position reset for next reading
        newData=true;
         // extract data from serial buffer to 8 bit integer value
         // convert data from ASCII to decimal
         read1 = ((sbuffer[1]-'0')*100) + ((sbuffer[2]-'0')*10) +(sbuffer[3]-'0');
         read2 = ((sbuffer[6]-'0')*100) + ((sbuffer[7]-'0')*10) +(sbuffer[8]-'0');
         read3 = ((sbuffer[11]-'0')*100) + ((sbuffer[12]-'0')*10) +(sbuffer[13]-'0');
      }
      else
      {
        //store serial data to buffer
        sbuffer[pos] = ch;
        pos++;
      }
    }
  }
}

void showNewData() {
 if (newData == true) {
    Serial.println("Calculating Results ... ");
    Serial.println(read1);
    Serial.println(read2);
    Serial.println(read3);
    newData = false;
  }
}
Advertisement


